As a service technician, one of the jobs you will be doing nearly every week is recovering refrigerant. It is against Federal law to release refrigerants into the atmosphere so a recovery machine is required remove the refrigerant from an inoperative or condemned air conditioning system There are two methods of removing refrigerant from a system. The first is to pump all available liquid into an approved refrigerant cylinder using the refrigeration system containing the refrigerant. The second is to use refrigerant recovery equipment commercially manufactured for refrigerant recovery. In this post we will discuss the the second method. The following information is for educational purposes only and should not be performed unless you have completed HVAC training and hold your EPA 608 Refrigerant Handling Certification.
BEZPEČNOSTNÍ OPATŘENÍ: DO NOT OVERFILL ANY REFRIGERANT CYLINDER; USE ONLY APPROVED CYLINDERS. Do not exceed the net weight of the cylinder. Wear gloves and safety glasses while transferring refrigerants.
Pumping the Liquid from the System Using Passive Recovery You must have an approved recovery cylinder to perform refrigerant recover.
- Note the capacity of the recovery cylinder.

- Calculate 80% of the cylinder’s capacity. Example 30 lbs. X .80 = 24 lbs. CAUTION – DO NOT FILL A REFRIGERANT RECOVER CYCLINDER ABOVE 80% OF ITS CAPACITY
- Fasten the low-side gauge line from you refrigerant gauge manifold to the suction connection of the AC system being recovered.
- Fasten the high-side gauge line to the king valve or a liquid-line connection of the AC system being recovered.
- Loosely connect the centerline of the gauge manifold to the refrigerant cylinder.

Note: More refrigerant can be transferred from the system to the recovery tank if the tank is empty and in a vacuum.
- Bleed a small amount of refrigerant from each line through the center line and allow it to seep out at the cylinder connection. This purges any contaminants from the gauge manifold and the refrigeration hoses.
- Set the recovery cylinder on the scale.
- Zero the display on the refrigerant scale.
- Start the system and open the valve arrangement between the liquid line and the cylinder. Liquid refrigerant starts to be pumped into the cylinder cylinder compressor the AC system.
- Watch the high-pressure gauge and do not allow the system pressure to rise above the working pressure of the refrigerant cylinder.
Note: DO NOT ALLOW THE CYLINDER WEIGHT TO EXCEED THIS MAXIMUM CALCULATED IN STEP 2.
- Watch the suction pressure on you gauge manifold and do not allow it to fall below 0 psig. When it reaches 0 psig, you have removed all the refrigerant from the system that you can, using this method.
- Remove the refrigerant cylinder. You may need to recover the remaining refrigerant using recovery equipment.
- Recovery can be sped up by setting the recovery cylinder in a bucket of ice, thus reducing the pressure in the cylinder.
There you have it! Most HVAC Service Technicians have not had the proper training on using this method of refrigerant recovery.

You can learn this and more with our online HVAC Training platform. Our HVAC training is video intensive and comprehensive way to learn HVAC online.
Across the US, air conditioning technicians are in short supply and high demand. This is a high paying career ($75K-$100K) for top technicians and cannot be outsourced and one of the few trades that survived and flourished during the 2020 Covid-19 pandemic.
After retiring from the U.S. Marines and achieving his B.S. degree, Ron Walker entered the HVAC field. He has been an HVAC technician, service manager, and business owner. Working as a service manager, he spent many years training HVAC technicians to be more technically competent and really understand their trade. His passion for teaching and helping others resulted in the creation of HVAC Training Solutions, LLC.
Understanding the liquid, vapor and push-pull refrigerant recovery methods will allow you to perform this important task as quickly and efficiently as possible.
One of the most common tasks a service technician will perform when maintaining or repairing HVAC systems is regenerace chladiva. Understanding the different recovery methods will help you perform this important task as efficiently as possible. Plus, when you follow proper refrigerant recovery procedures, you’ll prevent harm to both you and the equipment while getting the job done right the first time.
Bezpečnost především
One of the most important aspects of refrigerant recovery is safety. You must have the proper equipment for the type of refrigerant you‘re recovering. For example, systems charged with R-410A operate under significantly higher pressures than R-22 systems. This means you need equipment made to handle the higher pressures associated with R-410A.
The first thing you’ll need is a pair of ochranné brýle a dobrá sada rukavice to prevent frostbite.
Most technicians use a manifold set with two center utility ports — ¼-in. for recovery and 3/8-in. for vacuum — in addition to the blue and red low- and high-side ports. Make sure the manifold gauges are rated for the refrigerant pressure you’re working with.
You’ll also need a set of charging hoses with ball valve ends. It’s important to ensure both the hoses and the assemblies are UL recognized. And be sure to check the condition of your hoses prior to use. It’s best if you can use the shortest hoses possible for a given job, making for more efficient recovery and reducing the impact on the environment.
Obviously, you’ll also need a quality regenerační jednotka. Look for one with a large condenser, a compressor protection regulator (CPR) valve, and a high-pressure cutout switch rated for at least 510 psi. Some manufacturers offer a subcooling feature, which is an excellent way to increase your rate of recovery in high ambient conditions.
Finally, you’ll need the appropriate sběrná nádrž. When recovering R-410A, you need to use a U.S. Department of Transportation (DOT) 400 recovery tank. A standard DOT 350 tank will not safely handle the high pressures of R-410A. So be sure you have the right tank for the job and that you don’t fill it beyond 80% capacity (a DOT regulation). Another DOT regulation requires a recertification of the tank every five years, so be sure to check the date on your tank.
Overview of Recovery Types
When recovering refrigerant, there are three basic methods: tekutina, pára, a tlačit táhnout.
In the liquid recovery method, you are able to transfer refrigerant while it’s still in the liquid state. This method is especially good for transferring refrigerant from one container to another. Of the three recovery methods, liquid recovery is the fastest. So, why wouldn’t you use it? Because it’s simply not possible with all HVAC systems. In those cases, you’ll have to use the vapor recovery method.
Vapor recovery is slower than liquid recovery but also the most common method. It simply transfers refrigerant in the vapor state. The process for liquid recovery and vapor recovery are very similar. The only differences are the state of the refrigerant and some settings on the refrigerant recovery unit.
The push-pull method of recovery quickly removes liquid refrigerant, but it’s a two-step process: Once all the liquid is removed in the first step, you have to change hose connections to recover the vapor. In general, you’d only use the push-pull method if you have more than 10 pounds of refrigerant in a system.
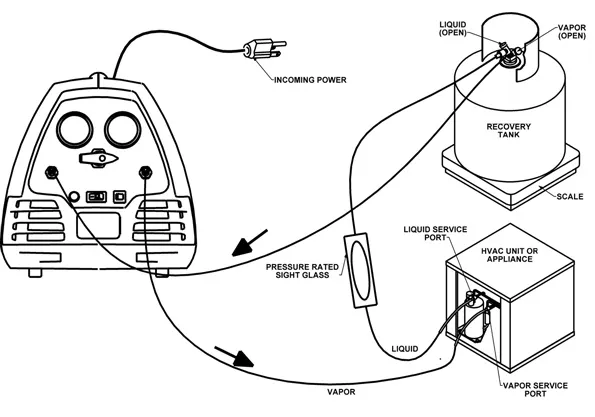
Step by Step: Liquid Recovery
v liquid recovery method, refrigerant is transferred while still in the liquid state. Let’s walk through the process.
When you’re ready to start, make sure the system you are servicing is turned off. Check that the recovery machine’s selector knob is set to off and all valves on your manifold are closed.
Connect the manifold to the system being serviced: high-side to the liquid port, and low-side to the vapor port.
Next, connect a ¼-in. utility hose from your manifold to the suction port of the recovery machine.
Finally, connect a hose from the liquid side of the recovery cylinder to the discharge port. Make sure that the ends of the hoses with the shut-offs are used at the suction and discharge ports. This is required by law.
Before beginning the recovery, purge all hoses of non-condensables.
Now, open the liquid valve on the recovery tank and you’re ready to turn the recovery unit on.
Turn the selector valve on the recovery unit to “liquid.”
Open the high-side valve and the utility port on the manifold.
The unit will recover until the low pressure switch shuts down the unit and the lamp indicates “recovery complete.”
Now you can turn the system switch off, and turn the selector valve clockwise to off.
You need to purge the recovery system after every service. Turn the system switch on and turn the selector valve to “purge.” Purging clears the recovery unit of refrigerant, reducing the risk of cross-contamination and prolonging the life of your equipment.
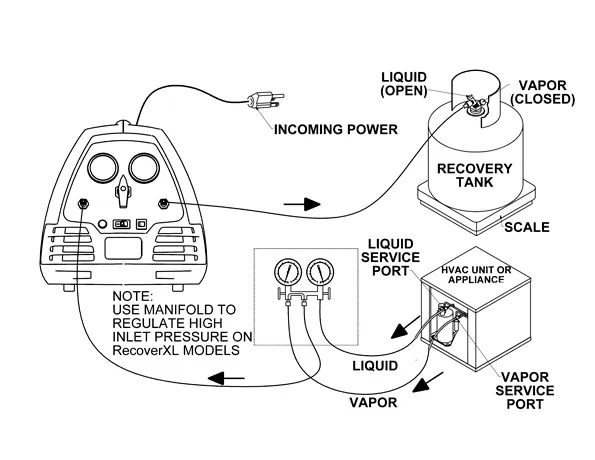
Step by Step: Vapor Recovery
In rekuperace par, the refrigerant is removed an HVAC system in a vapor state. Then the vapor is condensed into a liquid by the recovery unit and, finally, transferred to the recovery cylinder. The basic process is the same as liquid recovery to a certain point.
When you’re ready to start, make sure that the system you are servicing is powered off. Check that the recovery machine’s selector knob is also set to off and all valves on the manifold are closed.
Connect your manifold to the system being serviced: high-side to the liquid port, and low-side to the vapor port.
Connect the ¼-in. utility hose of your manifold to the suction port of the recovery machine.
Finally, connect a hose from the liquid side of the recovery cylinder to the discharge port.
You’ll want to be sure that the ends of the hoses with the shut-offs are used at the suction and discharge ports. This is required by law.
Before recovering refrigerant into the recovery cylinder, purge all hoses of non-condensables.
Turn the recovery unit on and turn the selector valve on the unit to “vapor.”
Open the utility port and the low-side valve on the manifold.
The unit will recover until the low-pressure switch shuts down the unit and the lamp indicates “recovery complete.”
When recovery is complete, turn the system switch off and turn the selector valve clockwise to off.
Again, you must purge after every recovery, so turn the system switch on and turn the selector valve to “purge.”
When the unit again shuts down and the lamp indicates “recovery complete,” your vapor recovery process is finished.
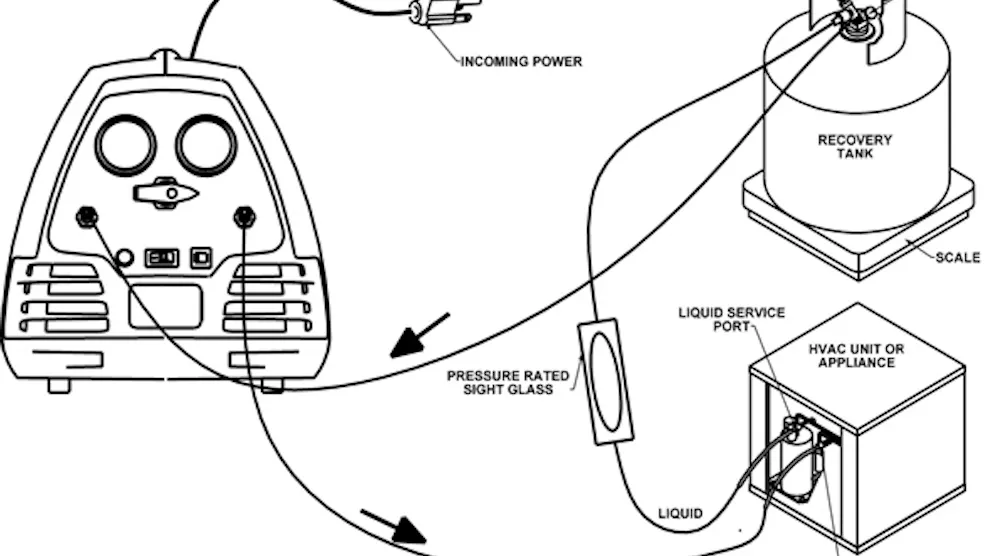
Step by Step: Push-Pull Recovery
Projekt push-pull recovery method is used for transferring large volumes of liquid refrigerant. The recovery unit “pulls” vapor from the recovery cylinder and produces high-pressure discharge gas that “pushes” liquid out of the HVAC system and back into the recovery cylinder.
You should NOT use the push-pull method if :
- the system contains less than 10 pounds of refrigerant,
- the system is a heat pump or other unit with a reversing valve,
- the system has an accumulator between the service ports used in liquid recovery, or if the refrigerant system does not allow for the formation of a solid column of liquid.
Because of the different set up, you’ll need extra equipment when performing a push-pull recovery: An extra hose, a recovery cylinder with no more than five pounds of refrigerant, and a sight glass rated for the pressure of the refrigerant you’re using.
Once you have everything you need, you’re ready to get started.
Connect a hose from the discharge port of the recovery unit to the vapor side of the HVAC system. Then, connect another hose from the liquid side of the HVAC system to the sight glass and on to the liquid side of the recovery tank. Finally, connect a hose from the vapor side of the recovery tank to the suction port of the recovery unit.
Once all connections are hooked up, purge the hoses of non-condensables before starting recovery.
Open the valves on the recovery tank.
Turn the selector valve on your recovery unit to “vapor,” and turn the recovery unit on. Recovery will start.
While recovery is in progress, closely watch the sight glass. When the passing liquid is no longer visible through the sight glass, or when the scale reading stops going up, the first step of the recovery is complete.
When it’s complete, close the vapor valve on the recovery tank and let the recovery unit run until the lamp indicates “recovery complete.” When recovery is complete, turn the system switch “off” and turn the selector valve clockwise to “off.”
At this point, you must purge the lines to prevent refrigerant loss. Turn the system switch on and turn the selector valve to “purge.” When the unit again shuts down and the lamp indicates “recovery complete,” the purge is complete.
Turn your recovery unit off, and close the “liquid” valve on your recovery tank.
Now you can reconnect your hoses as in a standard vapor recovery.
As mentioned earlier, push-pull is very fast when you have the right set up for it, but it is a two-step process, so it’s not always the appropriate method to use.
Once the hoses are reconfigured for vapor recovery, turn the selector valve to “vapor” and run the vapor recovery process, continuing until the unit shuts off.
Purge once more before you begin servicing your HVAC system.
This final purge clears the recovery unit of refrigerant, reducing the risk of cross-contamination and prolonging the life of your equipment. Remember, you must purge after every service!


